This document will describe how to setup MS Exchange 2013, 2016 and 2019 for configurating with SmartPOP2Exchange.
1. Open the Exchange System Manager
Use the task bar to open the Exchange System Manager
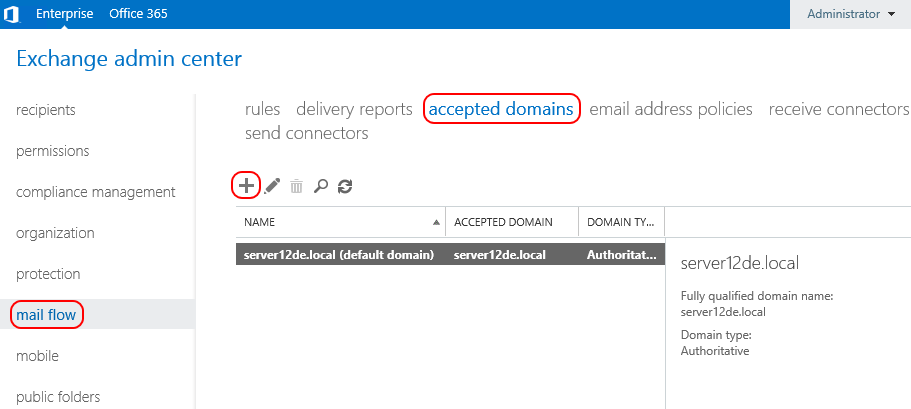
2. Setting the accepted domains
You need to tell the Exchange Server which mail domains it is responsible for.
Choose the Accepted Domains tab in the Mail Flow Configuration.
You may create one entry for every domain used by your users or by yourself and create a single entry for accepting all mail messages. This is only recommended if the Exchange server is not accessible from outside your network.
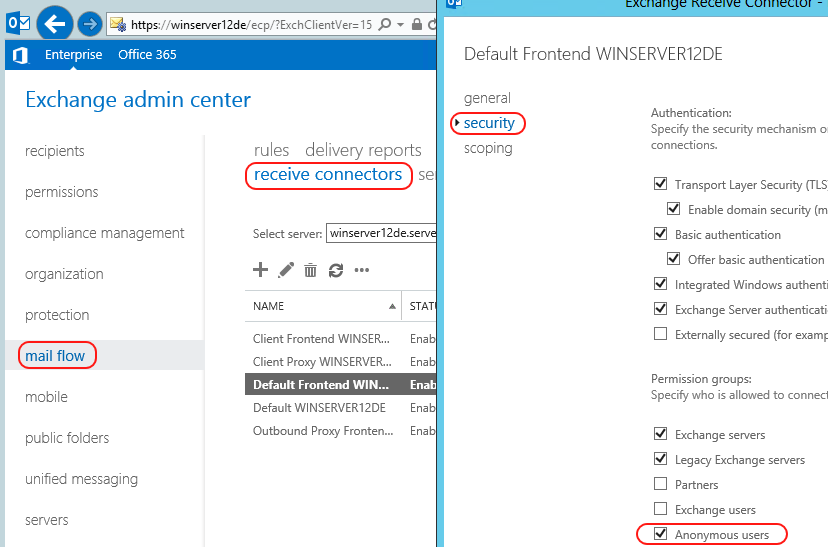
3. Setting anonymous access to the receiving SMTP
Unlike with Exchange 2007 the option enabling "Anonymous user" for incoming mails is activated in the "Default Frontend" Connector.
We recommend to keep this option enabled to by-pass SMTP authentication settings in SmartPOP2Exchange.
If you want to change this setting you can do so at the Receive Connectors tab in the Mail Flow Configuration.
4. Configure Outgoing Mail
By default the Exchange 2013 Server has no Send Connectors. So you need to set one up yourself.
Choose the Send Connectors tab in the Mail Flow Configuration and add a new Send Connector for outgoing mail with the following settings:
- Name: <choose one>
- intended use: Internet
- Network settings:
- choose the first option (MX)
if your Exchange is directly connected to the internet and has a fixed IP address.
- use the second option (smart host)
if you need to send your mail through the SMTP server of your provider.
You have to add that server name and enter your username/password on the following setup page
by using the "Basic Authentication" option.
- Address space:
- Type: SMTP
- FQDN: *
- Cost: 1
- Source Server: Add your server as source server.
5. Message rejected as spam by Content Filtering
This error message is caused by your Exchange Server and not a problem created by SmartPOP2Exchange.
Your Exchange Server also includes a simple spam filter module called IMF. This one refuses messages detected as spam by default.
Because of this SmartPOP2Exchange saves the message and creates that notification message which is instead send to the user to avoid mail loss.
To solve the problem you need to change the behavior of the Exchange Server and make it accept any message from SmartPOP2Exchange.
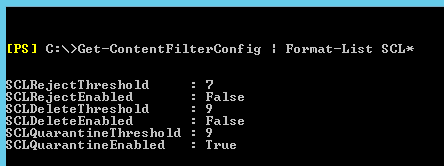
Changing the content filter configuration needs to be done via the Exchange Management Shell.
To disable the delete and reject action and enable the quarantine action you use the following command:
Set-ContentFilterConfig -SCLDeleteEnabled $false -SCLRejectEnable $false -SCLQuarantineEnabled $true
To see if the command worked you can use the command Get-ContentFilterConfig like:
Get-ContentFilterConfig | Format-List SCL*
If it worked you will see something like this:
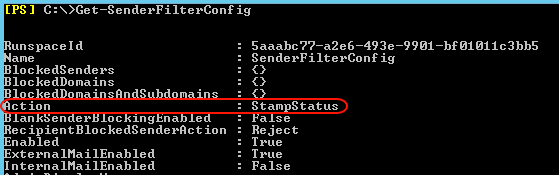
Configure the Sender- and IP-Filter
The Sender- and IP-Filter are configured similarly to the Content Filter.
The Sender Filtering needs to be configured to Stamp the Message and continue the processing instead of rejecting it.
This is done with the command:
Set-SenderFilterConfig -Action StampStatus
To see if it worked use Get-SenderFilterConfig and you should see something like this:
IP-Filtering can be disabled by using the command:
Set-IPBlockListConfig -Enabled $false
Use this command to check if it worked:
Get-IPBlockListConfig
You need to configure your Exchange Server to accept any message from SmartPOP2Exchange. Rejecting messages from SmartPOP2Exchange makes no sense.
What should SmartPOP2Exchange do with a rejected message? - Drop it? Then dropping could already be done by your Exchange Server.