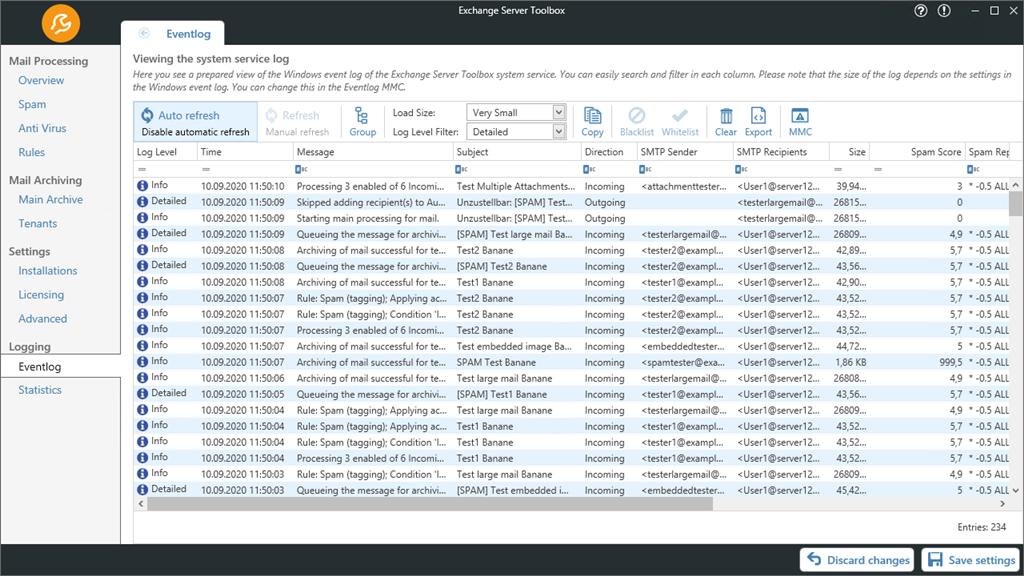
Use the Event Viewer to see how the Exchange Server Toolbox works and what properties have been determined for incoming emails.
Double click on a log entry to see the whole message and get more information (e.g. the backup path, spam score) about the processed email.
Apart from grouping, changes to how the EventLog is displayed will be saved even after closing the GUI.
Toolbar
The toolbar offers various options for viewing, managing, filtering, grouping or exporting the entries.
•Auto refresh: Enables or disables automatic refresh of the EventLog
•Refresh: Refresh the EventLog manually
•Group: Groups the entries by message ID
•Load Size: Select how many entries should be loaded
•Log Level Filter: Filters the entries according to the same rules as the logging depth
•Copy: Copies the selected entry/entries
•Blacklist: Adds the sender of the e-email that triggered the entry to the blacklist
•Whitelist: Adds the sender of the e-email that triggered the entry to the whitelist
•Clear: Deletes the entire EventLog
•Export: Exports the entire EventLog in one XML file
•MMC: Opens the Microsoft Event Viewer
Column functions
Right-click on one of the columns to open a menu.
•Sort ascending/descending: The entries of the EventLog are sorted by the column ascending/descending
•Clear Sorting: Removes the ascending/descending sort order. Only usable on columns that are currently being sorted
•Group By This Column: Groups the entries by the selected column
•Show Group Panel: Opens the group panel above the columns
•Show Column Chooser: Shows the column chooser. Here you can select and deselect columns for display
•Best Fit: Adjusts the width of the column so that the longest entry is fully visible
•Best Fit (all columns): Adjusts the width of all columns so that the longest entry is completely visible
•Filter Editor: Opens the Filter Editor, which contains extensive options for creating and customizing filters
•Show/Hide Search Panel: Shows and closes the search panel
•Conditional Formatting: Allows conditional formatting of the table, for example, highlighting rows that contain a specific value
Grouping of columns
The table can be grouped by selected columns using the "Group by this column" function. Once you have displayed the grouping field, you can drag the column headers into it to group by them. You can also change the order of the grouping by dragging and dropping in the grouping field.
With a right click on the grouping field, you can expand, collapse and remove all groupings.
A right-click on one of the groupings opens a menu.
•Full Expand/Collapse: The selected grouping is expanded/collapsed
•Sort Ascending/Descending: The selected grouping is sorted in ascending/descending order
•Clear Sorting: Removes the ascending/descending sort order. Only usable if sorting is currently done according to the grouping
•Sorting By Summary: After setting up a group summary, the groups can be sorted in ascending/descending order here
•Ungroup: Removes the selected group
•Hide Group Panel: Closes the group panel
•Show Column Chooser: Shows the column chooser. Here you can select and deselect columns for display
•Best Fit (all columns): Adjusts the width of all columns so that the longest entry is completely visible
•Group Summary Editor: Here you can define factors by which each group is sorted. For example, if you select "Spam Score" and "Max", the largest spam value of all elements in the group is selected for each group. Now the groups can be sorted by this value
•Filter Editor: Opens the Filter Editor, which contains extensive options for creating and customizing filters
•Show/Hide Search Panel: Shows and closes the search panel
Right-clicking entries
Right-click on one of the entries to open a menu.
•Copy: Copies the selected entry/entries
•Add sender to Blacklist: Adds the sender of the e-email that triggered the entry to the blacklist
•Add sender to Whitelist: Adds the sender of the e-email that triggered the entry to the whitelist
•Properties: Opens a detailed view for the entry just like when double-clicking it
Icon |
Meaning |
|
General error |
|
Info message |
|
Warning message |
|
Incoming email |
|
Outgoing email |
|
Internal email |
|
Backup of an incoming email |
|
Backup of an outgoing email |
|
Internal email backup |
|
email backup failed |
|
Spam email |
|
Virus email |
|
email delivery abort |
|
email refused |
|
Auto reply email |
|
email delivery aborted with activated auto reply |
|
email delivery aborted because of spam |
|
email refused as spam |
|
email delivery aborted because of virus in email |
|
email refused as virus infected email |