How does the duplicate search work?
The duplicate search is part of the TreeSize File Search, which can be started from the “Home” tab within the main module, or via the separate shortcut in your Windows Start menu.
Step 1: Activate the duplicate search and select a search path
To set up a duplicates search, first enable the checkbox “Duplicate Files” on the left side.
Use the panel above the search result list, to select the drive or path that you want to search. You can find additional information about how to set up a search path in this chapter.
It is also possible to search for duplicates across multiple drives or paths.
Step 2: Select a comparison method and minimum file size
The next step is to select the mechanism that should be used to compare files with each other. You can compare the files by their Name only, or a combination of Name, Size and Date.
The most accurate method, however, is the checksum. A duplicate search that uses file checksums is slower, but will be much more accurate, since the actual content of the files is used for the calculation.
To do this, select the “File Content” option from the ribbon menu, under “Duplicate Files > Comparison Method”.
It is also recommended to define a minimum size for the search, so that small files can be skipped quickly. Smaller files do not contribute much to the total size on the drive, so their removal would not gain much space.
You can also define other filters, such as “File Type” which can help speed up the duplicate search by running only on a specific subset of files.
Step 3: Run the search
Once you have configured all necessary parameters, you can run the search and analyze the results.
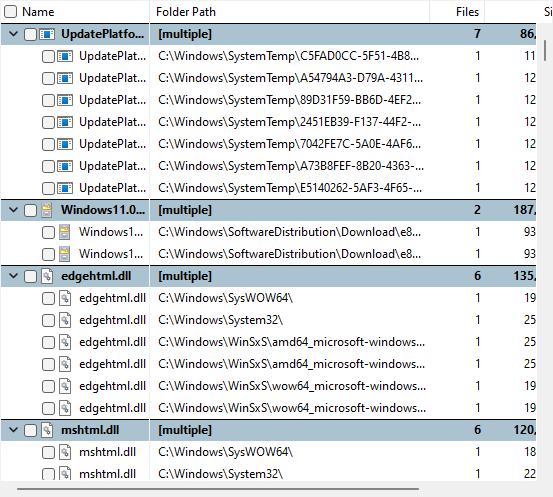
Each occurrence of a duplicate is arranged under a group in the result list.
The following screenshot shows an example configuration as mentioned above and shows the results of the search:

Step 4: Analyze the results and perform the cleanup operation
Deduplication
The easiest way to gain disk space with the duplicate search is performing a How does the deduplication work?.
Just check the files that you want to deduplicate and select “Deduplicate” from the ribbon menu.
TreeSize will replace all but the newest file with NTFS hardlinks. After the deduplication, the copies will no longer allocate space on the drive.
Delete/Archive
Another way to free up space is to delete the duplicate files from the disk.
In contrast to the deduplication, the duplicate files will be removed from disk completely. There will be no leftover link to the original data.
This also requires you to manually select the files that should be removed.
However, TreeSize offers a variety of functions that helps you select only the duplicate files, so that one “original” file will always remain.
In the ribbon menu for the duplicate search, you can find the category “List actions”, which provides functionality for checking “All but the …” newest, oldest, first or last file of each duplicate group.
This allows you to select all files of a duplicate group but leave one file unchecked (the one file that will not be deleted).
If you want to make a more customized selection, such as “only files from drive G:\", you can use the “Check if” dialog to create a custom selection pattern.
To this end, it may also be useful to select “Ensure one unchecked file per group”. If this option is enabled, TreeSize will ensure that one file per duplicate group remains unchecked under all circumstances. This prevents cases, where all files of a group were checked accidentally, so that no original file would be left over, after the delete operation.
After checking the files that should be deleted, click “Delete items” in the ribbon menu to trigger the deletion dialog (Move checked files), where you can select what operation should be performed.
You can either delete the files, or move them to a different location. In both cases, you can create a log file of the operation, which provides a summary of the operation and allows you to verify the results.
Finally, click “Execute” to start the operation.