SharePoint Search
To search SharePoint with UltraSearch simple and fast, UltraSearch allows you to access your SharePoint directly without creating your own Azure app registration.
When you first login, UltraSearch asks for a permission to search SharePoint.
In some cases this will require the approval of your administrator. This approval should be tenant-wide and is only required once per company/tenant.
Optional: Grant tenant-wide consent without having to install UltraSearch.
Use of your own Azure registration
Alternatively, you can use your own Azure registration which gives you more control and flexibility in configuration. Find more information in the Azure configuration section.
Choose this option if:
you want to restrict access to your SharePoint for certain users (user based authentication)
you want to use certificate-based authentication
Azure Configuration
If a SharePoint Online site is configured to require a multi-factor authentication, UltraSearch will perform a browser based authentication (as known from other Azure apps).
To enable UltraSearch to get authentication tokens from your Azure tenant, you have to register it in your Azure portal first and grant it permission to access SharePoint Online:
Register UltraSearch with your tenant
Please note that the following steps have to be done out of the scope of UltraSearch. They may change with the ongoing development from Microsoft.
Sign in to the Azure portal.
Select on All services in the left-hand navigation, and choose App registrations (or use the search field in the top bar)
Select New application registration and create a registration with values like:
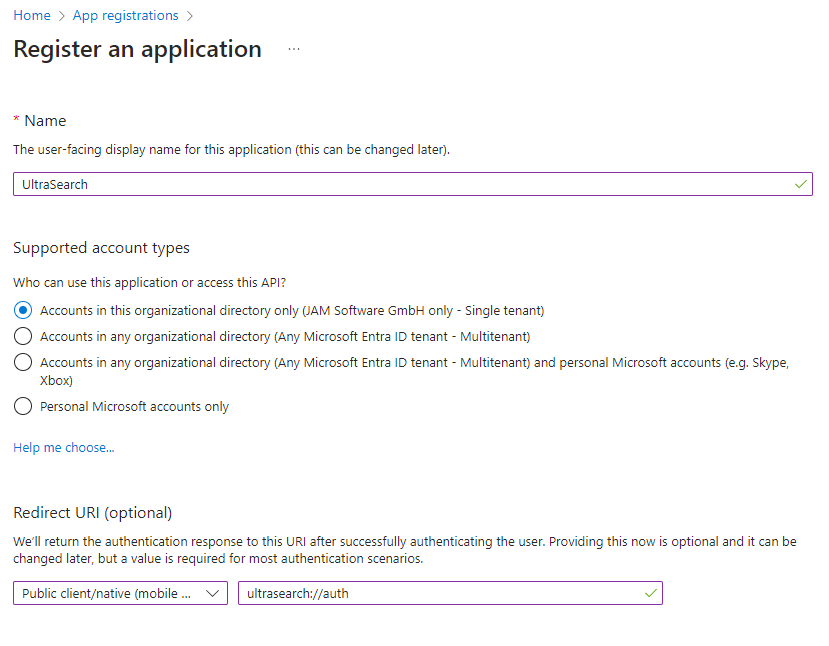
Name: An application name of your choice to identify the registration in Azure We would propose to use UltraSearch.
Redirect URI: Sometimes reffered to as reply URL. Please select ‘Public client/nativ’ here. Because UltraSearch uses MSAL for authentication, please either use the redirect URI provided for this purpose, or define your own according to the scheme “My URI”://auth, e.g. treesize://auth
Once the registration is completed, Azure will assign a unique Application ID to the app. Copy this value from the right pane, as it will be required for the next steps.
Provide UltraSearch with the configuration information
In order to use the app registration made above, the information has to be provided to UltraSearch. There are three options available how to achieve this:
If you want to configure these settings for a single user/computer only, (e.g. to evaluate and test the settings), you can do so in the options dialog or you can pass the values to UltraSearch via the command line.
To configure the registration in UltraSearch:
Select the “Options” tab in UltraSearch and then “Connect with SharePoint” from the “General” dropdown
Then provide the application ID as well as redirect URI defined above and hit save.
Now you can add SharePoint paths as search targets.
To configure the values from the command line, run UltraSearch with the following parameters. UltraSearch will remember these values, so you would have to configure them only once.
/AADApplicationID followed by the Application ID assigned by the Azure Portal, e.g. /AADApplicationID xxxxxxxx-yyyy-xxxx-yyyy-xxxxxxxxxxxx, and
/AADRedirectURI followed by the Redirect URI specified during the registration assigned, e.g. /AADRedirectURI UltraSearch://auth
If you want to configure these settings for a group within your company, you can define a group policy object to roll them out: 1. Download and install the administrative templates for UltraSearch. 2. Open the Group Policy Management Console and navigate to the GPO you want to contain the configuration or create a new one. 3. Configure the entries at User Configurations > Administrative Templates > JAM Software > UltraSearch > Defaults
Certificate-Based Authentication
Certificate-based authentication allows UltraSearch to identify itself to the authentication service using a digital certificate instead of user credentials.
Before starting, ensure you have:
Administrative access to your Azure app registration
Permission to create certificates on your system
Step-by-Step Setup Guide
Step 1: Create a Self-Signed Certificate
For creating a certificate file the command New-PnPAzureCertificate for PowerShell is used. Visit the documentation for reference: https://pnp.github.io/powershell/cmdlets/New-PnPAzureCertificate.html
Note
In order to use this command you need to import the PnP.PowerShell module using the command: Import-Module PnP.PowerShell
Generate the certificate files:
Create both a .cer file (public certificate) and a .pfx file (private key with certificate)
Use a descriptive name for your certificate (e.g., “Auth-Cert”)
Note
We recommend using “Example 3” in the documentation as reference for creating a certificate with password.
Verify certificate creation:
Confirm both .cer and .pfx files are created
Note the certificate thumbprint for future reference
Store the .pfx file securely with its password
Step 2: Configure Azure Registration
Upload the certificate:
Navigate to your Azure app registration
Go to “Certificates & secrets” section
Click “Upload certificate”
Select and upload the .cer file created in Step 1
Step 3: Configure API Permissions
Add SharePoint permissions:
Go to “API permissions” in your app registration
Click “Add a permission”
Select “Microsoft Graph” from the Microsoft APIs
Choose “Application permissions”
Add “Sites.Selected” permission
Note
Make sure that steps c and d are correctly configured for the granted permission or it might later lead to an incorrect authentication.
The Sites.Selected permission allows your application to access only specific SharePoint site collections that have been explicitly configured, providing granular security control.
Grant admin consent:
Click “Grant admin consent” for your organization
Confirm the permission is granted (status shows green checkmark)
Step 5: Configure UltraSearch
Certificate configuration:
When prompted, configure UltraSearch to use the .pfx file for authentication
Provide the path to the certifcate file and the certificate password