Application Menu
The Application Menu (or “File” menu) allows you to select folders for scanning, loading, saving, exporting, or comparing collected data. It also provides access to the application settings and allows you to exit TreeSize.
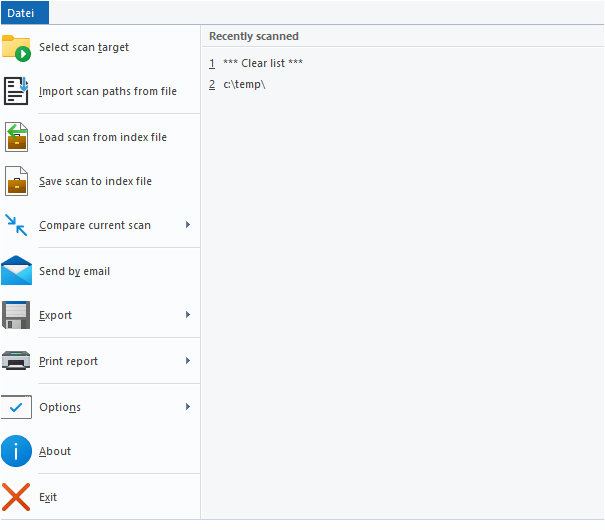
Main menu
Recently Scanned
List of recently scanned paths and drives. Clicking a path will start a scan of this path.
Select directory for scan
Shows a dialog which lets you choose a target for scanning. When the selection has been confirmed, TreeSize starts scanning the selected path. You can also enter a path directly into the drive combo box in the toolbar.
Load scan from index file
Load a saved TreeSize scan from an index file. That way you can view earlier results without performing a whole scan again.
Save scan to index
Save the current scan to an index file. This file can be loaded in TreeSize again or can be used to perform a comparison at a later time. Please note that the information about single files is not saved to the XML since this would increase the size of the XML files too much. Only the information about folders is included in the file. If you need reporting on file level, please use the SQLite format or our software SpaceObServer may be useful for you.
Import scan paths from file
Allows you to import a list of paths from a file and automatically starts scanning the imported paths. The file containing the paths to be scanned should be in .txt or .csv format.
Compare current scan
Compare the current scan against a previously saved scan (index file) or a Snapshot (only supported for local NTFS drives). After comparison, folders unchanged in size will show up with a size of 0 while folders that have grown will have values greater than 0 and will be displayed in red color. Folders that became smaller compared to the loaded report will have negative values and will be displayed in green color.
Send by Email
Send the Directory Tree (left pane) via email.
Export
Export the Directory Tree, chart or list content to a file. See chapter Export submenu.
Print report
Print the Directory Tree, chart or list content. See chapter Print submenu.
Options
Open the options dialog of TreeSize. The submenu also contains commands that allow you to import/export and reset the current options.
About
Show version number and contact information.
Exit
Closes TreeSize.
Export Submenu
The menu items in the export submenu allow you to export the collected scan data in several different ways. You can customize the kind of data (columns) that will be exported as well as other export options using the options dialog of TreeSize.
You can also choose whether only those folders currently visible (expanded) in the Directory Tree or all folders will be exported. Please use the Expand button on the Home or Scan tab (or in the context menu of the Directory Tree) to expand and collapse or expand folders to a certain level.
Plain text
Export the Directory Tree to a tab-separated text file. To configure the behavior for text exports, go to Options -> Text.
CSV file
Export the Directory Tree to a CSV file (comma separated values). To configure the behavior for CSV exports, go to Options -> CSV.
Excel file
Export the Directory Tree to a Microsoft Excel file. Supported formats are the conventional .XLSX file format (introduced with Excel 2007) as well as the former used .XLS (Excel 97-2003). Paths are exported as clickable hyperlinks. This allows you to quickly jump to the appropriate path in the Windows Explorer. To configure the behavior for Excel exports and the charts that should be included, go to Options -> Excel.
HTML file
Enables you to save a report as an HTML file which can be viewed with any HTML browser later. HTML files are easier to read than text files and don’t require a special application like MS Excel. The HTML file will be UTF8-encoded and thus includes Unicode characters. To configure the behavior for HTML exports and the charts that should be included, go to Options -> HTML. There you can also define a custom CSS stylesheet that will be used for the HTML export.
PDF file
Enables you to save a report as an PDF file which can be viewed with any PDF Viewer later. PDF files are easier to read than text files and only require a free PDF viewer, which is included in Windows 8 and later. To configure the behavior for PDF exports and the charts that should be included, go to Options -> PDF.
Copy to clipboard
Copy the Directory Tree to clipboard in text format.
Copy list of files
Copy a list of all files in the current folder (and its sub-folders) to the clipboard. You can paste this list to your favorite spreadsheet or word processor. The settings for the text export in the options dialog determine which columns will be included in the list.
Set export title
Allows you to set a title, which will be included with the header of an export or print. The default title includes the path of the scanned folder and the volume name of the drive the folder resides in. The use of environment variables is allowed.
Print Submenu
TreeSize offers a wide variety of flexible printing functions. You may, for example, print the content of the Directory Tree, the contents of a selected folder or any available chart (Charts view, History view, etc.).
The following commands are available in the “Printer” submenu:
Print report
Print report for the currently selected scan without preview.
Print with preview
Shows a print preview for the report of the currently selected scan.
Print right pane
Print the chart or list currently shown the right pane of the window.
Set export title
Allows you to set a title, which will be included with the header of an export or print. The default title includes the path of the scanned folder and the volume name of the drive the folder resides in. The use of environment variables is allowed.
Page setup
Change page layout settings.
Print setup
Change printer settings.
Customize report
Customize exported columns, included charts, etc.